When it comes to growing Panaeolus cyanescens, you’ve probably come across a lot of conflicting advice online about which substrate is best. From fully composted manure is the gold standard, to coir/verm plus liquid nutrients works great, to Pans don’t need manure at all.
With people claiming success from all directions, it can be hard to know which advice to trust and which to ignore.
The problem is that most of these suggestions overlook the fundamental question: what are Panaeolus cyanescens actually eating?
Once you understand that, it becomes a lot easier to make confident and informed decisions on your own.
My goal with this post is to help you do exactly that. We’ll look at what Pan cyans feed on in nature, how to build a substrate that mirrors those conditions, and what to use when classic ingredients like straw or manure aren’t available.
Panaeolus Cyanescens Habitat and Role in Nature
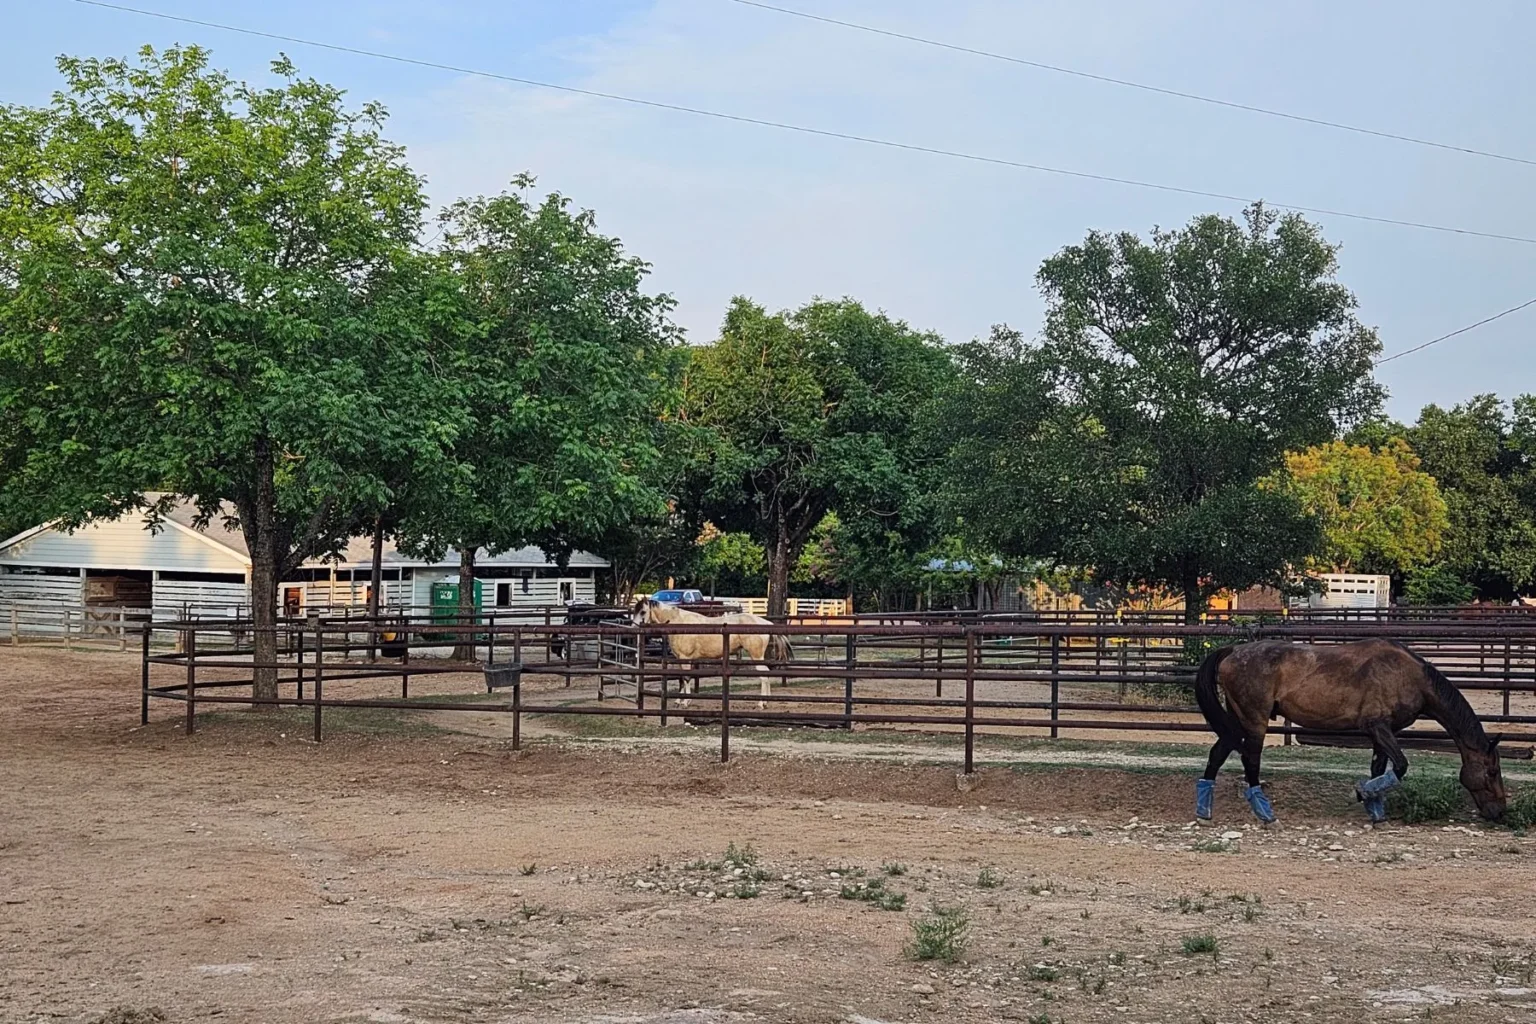
Panaeolus cyanescens are like nature’s cleanup crew. While they’re found across tropical and subtropical regions, they’re particularly abundant in pastures where large herbivores like cattle, horses, and water buffalo graze. They’re part of a group known as coprophilous fungi (which means they are specialists in breaking down dung), and their role in decomposition follows a specific timeline.
Pan cyans don’t appear when manure is fresh, nor do they wait until it’s fully decomposed into soil. Instead, they pop up at a specific stage, right after the first wave of bacteria and heat-loving microbes have partially broken down the material. These early decomposers transform complex compounds into more accessible nutrients, creating the ideal conditions for Pan cyan growth.
They do more than just decompose dung though. Panaeolus cyanescens form sophisticated relationships with grass roots and the surrounding microbial community. They flourish in environments where sunlight reaches to ground, air circulates freely, and ammonia levels have naturally declined. Understanding these preferences provides helpful insights for recreating their ideal growing conditions.
What Are Panaeolus Cyanescens Actually Eating?
To build an effective substrate, it helps to understand what nutrients Panaeolus cyanescens need. While they’re undeniably dung lovers, their diet is a little more refined than that. They thrive in partially decomposed organic matter that is rich in structure, microbial activity, and carbon.
The primary food sources for Panaeolus cyanescens include:
- Cellulose & Hemicellulose: Complex carbohydrates from undigested plant material. Think of them as slow-release energy for Pan cyans.
- Lignin: A tough, fibrous polymer found in plant cell walls. It only becomes accessible to the fungi once early-stage decomposition begins breaking it down.
- Simple Sugars & Amino Acids: Released by microbes as they digest organic material, these smaller compounds provide a more immediate source of nutrients.
- Microbial Biomass: Pan cyans also have an appetite for the remains of dead microbes, utilizing their cellular contents as a nitrogen source.
Contrary to what most grow guides suggest, Pans aren’t after fully composted, mineral-rich soil. What they want is material that’s midway through decomposition. Something with structure, digestible carbon, and a thriving microbial scene. This is the balance that fuels strong, healthy growth.
Best Substrate for Panaeolus Cyanescens
Herbivore Dung
When it comes to coprophilous mushrooms like Panaeolus cyanescens, there’s really no substitute for manure. It strikes the perfect balance of nutrition, structure, and microbial activity – three essential elements for healthy growth.
Why manure works so well
- Undigested cellulose, hemicellulose, and lignin: Long-lasting energy sources
- Low but accessible nitrogen: Supports protein synthesis without overwhelming the mycelium
- Rich microbial community: Helps break down complex substrates into usable nutrients
- Balanced moisture and porosity: Supports both air exchange and hydration
Grass or Straw
Straw provides the carbon backbone of the substrate, offering structural integrity, improved airflow, and slow-release carbohydrates. It lightens the mix and keeps things breathable which Pans really appreciate.
Structure and Porosity
Nutrition alone isn’t enough though. Airflow is equally important. Panaeolus cyanescens are fast-growing, aerobic decomposers that thrive in loose, fibrous substrates similar to the soil structure in natural grasslands. When the substrate is too dense, it can stall colonization and create the perfect conditions for contamination.
Why overly compact substrate is a problem:
- Oxygen exchange is limited: Fungi, like us, need oxygen. When airflow is restricted, growth slows or stalls.
- CO₂ builds up: Excess carbon dioxide creates toxic conditions for the mycelium
- Uneven Pasteurization: Dense materials don’t heat evenly, leaving space for contaminants to survive.
- Poor drainage: Wet pockets promote bacterial infections and suffocate the fungi
By contrast, a well-structured, breathable substrate:
- Encourages fast, even colonization: Healthy mycelium spreads quickly through porous material.
- Supports microbial activity: Beneficial microbes continue digesting organic matter, extending nutrient availability.
- Manages moisture effectively: Prevents bacterial growth while keeping the substrate hydrated.
- Promotes Ideal Fruiting Conditions: The airy structure supports growth
Think of it like this: Manure feeds. Straw breathes. Air lets it all work.
Fresh vs Partially Decomposed vs Fully Composted Manure: Which is best?
When it comes to choosing manure for Pan cyan substrate, the stage of decomposition significantly affects its value.
Understanding Manure Composition
Only about 30–50% of manure (by dry weight) contains the fibrous material Panaeolus species can actually digest, like cellulose, hemicellulose, and lignin. The rest consists of minerals, humic acids, and plant-available nutrients which is great for plants and veggies, but not so much for mushrooms.
Manure Comparison Table
| Type | Pros | Cons | Verdict |
|---|---|---|---|
| Fresh (Sun-Dried) | Rich in cellulose, lignin, and thriving microbial life | May contain ammonia or pathogens if not properly treated | Excellent once flushed and sun-dried |
| Partially Decomposed | Ideal balance of structure, microbes, and reduced ammonia | Requires thorough pasteurization to eliminate competing organisms | Perfect stage for cultivation |
| Fully Composted | Clean, stable, low contamination risk | Most usable nutrients already gone | Great for garden beds, not for mushrooms |
Why Partially Decomposed is Best
By the time manure is fully decomposed, most of the fibrous material has been broken down into humus and minerals and the complex carbs Pans thrive on have already been consumed by earlier decomposers.
Nutritionally, fresh and partially decomposed manure aren’t that different. What really matters is the ammonia and bacteria levels, both of which can inhibit mycelial growth.
Smelling it is the best way to test. You want a mild, subtly sweet, earthy smell. If it stinks, it needs to be leached first (or just toss it back into the pile and collect pieces that don’t stink).
Storing and Aging Your Manure
If you have the space, the easiest way to maintain the partially decomposed sweet spot is to spread it out on a tarp in your backyard. This gives the manure plenty of breathing room and sunlight. If you don’t have a yard, a deck or patio works too. Just make sure it gets direct sun for at least part of the day.
What you don’t want to do is stack it in a tall pile, seal it in a container, or store it somewhere damp and shady. This traps moisture and blocks airflow, creating the perfect conditions for mold, bacteria, and ammonia to grow.
Timeline Guide
| Type | Time | How to Tell It's Ready |
|---|---|---|
| Fresh (Sun-Dried) | 2-5 days | Crumbly when dry but rehydrates easily. Smells mild and earthy. |
| Partially Decomposed | 3-12 months | Darker in color. Humus like texture. Smells like compost or garden soil. |
| Fully Composted | 1-3 weeks | Partially broken down but still holds some structure. Smells mild and earthy. |
Substrate Recipe for Panaeolus cyanescens
Here’s my favorite recipe:
- 2 parts chopped straw
- 1 part sun dried horse manure
- .25 part fine or medium grade vermiculite
- Enough pickling lime to bring the pH to 7.5-8
- Water to field capacity
- Beneficial Bacteria (optional)
1 part = 1 tray. This recipe makes 4 trays worth of substrate.
Substrate Preparation Tips
- Grab a container large enough to hold all of your ingredients
- Break up your manure (by hand or with a blender), and add it to the container
- Add straw and vermiculite, then lightly mix it all together (be careful not to breath in the dust)
- Add enough water to bring the substrate to field capacity (thoroughly damp but not dripping when squeezed)
- Add pickling gradually until the pH reaches 7.5-8
Pasteurizing Your Substrate
My favorite way to pasteurize substrate is in a turkey roaster oven. I like them because they hold temp really well and are large enough to make good sized batches without packing your sub down.
Most guides will tell you pasteurize between 140°-160°F (60-71°C) for a minimum of 4 hours, but I prefer to pasteurize between 145°-158° (62-70°C) for 8-12 hours. The lower end helps preserve beneficial microbes while the higher end does a better job of eliminating mold and other competition.
Tip: Don’t pack your substrate down. You want to keep it fluffy so heat and oxygen can move through it freely.
Sterilizing Your Substrate
If you prefer to sterilize your substrate, you can do that in a pressure cooker for 2.5-3 hours at 15 PSI.
Best Alternatives to Straw and Manure
While there’s no single ingredient that can replicate everything manure does, there are a few that partially fill the gaps so if you can’t source manure, don’t worry, you can still successfully cultivate Panaeolus cyanescens.
Heres a look at some of the most common substitutes and how they compare:
The goal is to find substitutes that offer carbon, structure, and digestible nutrients – ideally with a diverse microbial profile.
Best Manure Free Substrate Recipes
Out of the options above, the only 3 I’d recommend are sugar cane mulch, leaf mold and compost (if you can find some that hasn’t been fully broken down). If you can’t source any of these, I would just use a highly nutritious grain like sorghum/milo or hard red wheat and fruit on coir/verm. Your yield may be smaller but you should still get a couple decent flushes and won’t have to worry about the added risk of contamination the other alternatives bring with them.
Recipe 1: Coir + Leaf Mold + Straw
Microbially rich with balanced structure
- 1 part coir (hydrated from brick)
- 1 part leaf mold (crumbled, partially decomposed—not dusty)
- 1 part chopped straw (pasteurized)
- 0.25 part vermiculite (optional, for aeration)
- Pickling lime: to raise pH to 7.5–8
- Water: field capacity
- Beneficial bacteria (optional but recommended, added with grain spawn)
Pros: Great microbial diversity, good structure, fairly resistant to contamination
Pasteurization: 145–158°F for 4–8 hours
Notes: Leaf mold adds a powerful microbial edge similar to partially decomposed manure, best stored in a dry state before use.
Recipe 2: Sugar Cane Mulch + Coir
Lignin-rich and easy to source in many regions
- 1.5 parts sugar cane mulch (chopped fine, pasteurized)
- 1 part coir
- 0.25 part vermiculite (optional)
- Pickling lime to adjust pH
- Water to field capacity
- Beneficial bacteria with spawn
Pros: Excellent structure, long-lasting nutrition from lignin
Pasteurization: Minimum 4 hours; 8–12 preferred for cane mulch
Notes: Mulch must be clean and free from mold or pesticides. Fluffiness helps with airflow.
Recipe 3: Light Compost + Straw + Coir
The closest match to a traditional manure mix
- 1 part coir
- 1 part partially decomposed compost
- 1 part chopped straw
- Pickling lime to raise pH
- Water to field capacity
- Optional: vermiculite or gypsum for aeration and structure
Pros: Mimics some nutritional and microbial benefits of manure without the stink
Pasteurization: Must be thorough, compost often harbors more competitors
Notes: Choose a compost that’s still a bit coarse, avoid black, powdery, humus-heavy blends.
Conclusion
While manure and straw are the best combo for growing Panaeolus cyanescens, there’s no single “right” recipe. With the proper balance of structure, nutrition, and moisture, alternatives like sugar cane mulch, leaf mold, and even classic coir/verm can produce good results.
What matters most is understanding the fundamentals: what Panaeolus cyanescens actually eat, why structure matters, and how to create conditions that mirror their natural habitat. Once you know these principles, you can confidently experiment with different ingredients and ratios to make a substrate that works best for you.
FAQs
Is manure necessary to grow Panaeolus cyanescens?
No, it’s not necessary but they definitely do better with it. If you don’t have access to manure (or any of the recommended alternatives above), coir/verm paired with a nutritious grain like milo or hard red wheat should still give you a couple decent flushes.
What kind of manure should I use?
Partially decomposed horse or cow is ideal, but any grass-grazing animal manure should work fine.
How long does manure need to age before I can use it for Panaeolus cyanescens substrate?
Technically, it doesn’t need to age at all. As long as it doesn’t stink, just let it dry out in the sun for a couple days and its good to go. With that said, partially decomposed manure works best. To partially compost your manure, you can spread it out in a thin layer and leave it in the sun for 1–3 weeks.
Where do you find manure?
Most farms are thrilled to have someone haul manure off their property so if you live near one, give them a call! You could also Google “free local manure” (that’s how I found the farm I source mine from), or check local Facebook groups and Craigslist. If you’re not within driving distance, you can find manure online from places like Etsy or buy directly from farms.
What’s the easiest way to prep manure if I’m nervous about bacteria?
Just flush it with water and let it dry in the sun for a few days. If it doesn’t stink and has a fibrous texture, it should be good to go. It’s always a good idea to wear gloves when handling manure too.
Do I need to sterilize or pasteurize my Pan Cyan substrate?
This is a personal preference and there’s pros and cons to both. Pasteurizing preserves some of the beneficial microbes but it also comes with the risk that you may not eliminate all competing organisms. Sterilizing eliminates all competing organisms (including beneficial microbes), but leaves it more susceptible to contamination. I personally prefer pasteurizing substrate and then adding beneficial bacteria back in when mixing in grain spawn.
Do I need to add gypsum to my substrate?
You don’t need to, but a small amount can improve structure and provide calcium and sulfur, which mushrooms benefit from. It also helps prevent clumping.
How do I know if my substrate is at field capacity?
When it’s moist all the way through but not dripping water when squeezed.
Do the ratios need to be exact?
Nope! Eyeing everything perfectly fine. Using trays to measure helps ensure you’ve made enough, but there’s no need to stress over exact ratios.
Can I use liquid nutrients instead of manure with coir/verm?
You can, but it’s not ideal. Liquid nutrients don’t provide the structure, fiber, or microbial life that make manure-based substrates so effective. Coir and vermiculite on their own are pretty inert, so just adding liquid nutrients can throw off the moisture balance and invite contamination if you’re not careful. If manure isn’t an option, a better route is to pair coir/verm with a more nutritious grain like milo or hard red wheat. It’s simpler, more stable, and still capable of producing decent flushes.
What if I can’t find straw?
Sugar cane mulch is a great substitute for straw, just make sure it’s dry, seedless, and not fermenting. If that’s not available, you can add a bit more vermiculite to help with structure and airflow.
Can I use compost from a garden center?
You can, but most store bought compost is fully broken down, which makes it better for plants than mushrooms. If you want to use compost, I’d recommend looking for one that’s partially composted.
How can I tell if my compost is too decomposed for use?
If it’s dark and fine like potting soil with no visible plant matter or fibers, it’s likely too far gone. Look for compost that still has bits of straw, leaves, or other fibrous material.
What’s a good, simple casing layer recipe for Pan Cyans?
50% Sphagnum peat moss, 50% vermiculite + enough pickling lime or calcium carbonate to bring the pH up to 7.5-8. You can also just buy a bag of Jiffy Seed Starter and use that.
Why is a casing layer so important for Pan Cyans?
A casing layer helps maintain surface humidity, creating the microclimate Pans need to start pinning. It also helps protect the colonized substrate.
Can I skip lime in the substrate or casing layer?
You can but I wouldn’t recommend it. The natural pH for Pan cyan substrate and casing is about 5.5-6 which is the sweet spot for mold. Using lime or calcium carbonate to raise the pH to 7.5-8 helps slow down and prevent contamination.